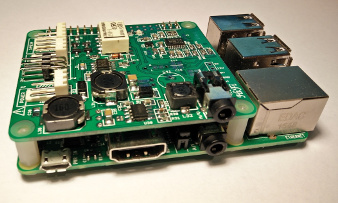
Special HiFi Edition ♬♪♫ For Raspberry Pi 2 or 3
This special version of the PiBUS board adds a high-end 24-bit 192-KHz stereo DAC.You can think of this like an extra sound card for your Pi. The DAC used is a Texas Instruments PCM5102 (audiophile grade!), which allows the Raspberry Pi to output a high quality signal to your amplifier, better than what the Raspberry Pi can normally deliver.
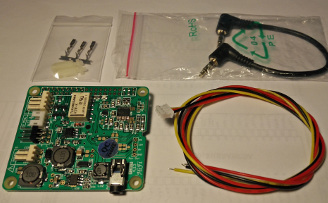
These boards are supplied assembled (no soldering required), but you will need to install a few wires and the software. Please read the details thoroughly so you understand exactly what you're getting. Here's the list of inclusions:
- Assembled PiBUS 4 HiFi board.
- Two nylon stand-offs and four screws.
- A 3-pin 60cm cable to connect to the BMW TV module (DIY installation required).
- 3 BMW-style crimp pins for the above cable.
What's NOT included?
|

|
What exactly does it do?
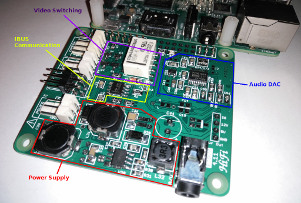
It's an all-in-one solution that plugs right ontop of the Raspberry Pi and it:- Provides a power supply (5 Volts) for the Pi.
- Turns the Pi on at the appropriate time and off again so it doesn't drain your battery when the car isn't in use.
- It has circuitry to talk to the car's bus (IBUS).
- Manages your reversing camera video signal and power supply (optional).
- DAC: Turns the Pi's digital sound signal (I2S) to line-out.
Requirements
- A Raspberry Pi computer, model A+ or B+ or Pi2 or Pi3 (the ones with a 40-pin header). This model is the best version to buy currently.
- An IBUS based vehicle with TV module (e.g. E38, E39, E46, E53). This means if you press the MENU button you must have the TV item in the list. The TV unit should have BLUE and WHITE plugs accessible (usually in the trunk/boot).

- It can also work in an X3 or Z4 but installation may be more difficult. Please check the location and accessibility of the TV module and CD-changer cables, which might be far away and require some DIY cabling.
- The following two connectors (CD changer cables) must be available in the boot/trunk. You might find them wrapped in foam or if you already have a CD changer, it must be disconnected.
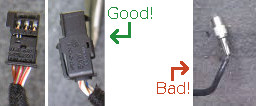
- If your car has a DSP1 (usually coupled with a BM24 radio) it will be incompatible, as it lacks analog audio input. But, if you combine a PiBUS board with a HiFiBerry Digi+, this problem can be overcome. Cars with DSP2 (BM54/53 radio) will be fine, as long as the 6-pin connector (pictured above) is available.
- If you already have a factory fitted reversing camera, installation is more complicated. I am not able to support you, take your own responsibility.
TV-Module cable installation
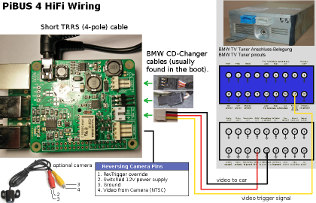
A 3-pin cable and crimp pins are supplied. You need to crimp or solder these to the wires and then insert them into the TV module white and blue plugs.There are three wires to be inserted into the TV module plugs.
Blue Plug: Pin 17.
White Plug: Pins 13 and 14.


Reversing Camera
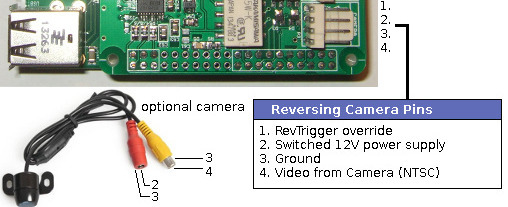
A reversing camera is an optional extra you might like to add. There are plenty of cameras available on EBay for approximately $20. There is a four-pin header on the PiBUS board to allow connection of a standard NTSC camera. The connector type on the PiBUS board is KF2510, which can be found on Ebay for peanuts. Here is a description of each pin:
| Pin | Name | Explanation |
| 1 | REV_EN | If 12V is applied to this pin, the monitor will immediately switch to the reversing camera. Normally this connection is not required, as the PiBUS board can already detect the reverse gear from an IBUS message. You could connect this to Pin1 of the Navigation Unit's purple plug, or just leave it unconnected. |
| 2 | SW_12V | Switched 12V power supply. You can use this to power the camera, but may prefer to use the reversing lights as a power supply. The advantage of using this pin to power the camera is that it allows you to activate the camera even when NOT in reverse gear. |
| 3 | GND | Ground for video & power supply. |
| 4 | NTSC_VID | Video signal from camera. |
