Software Installation
Download LibreELEC 8.0.x. Install it on your Raspberry Pi and make sure it's operating normally. Use a keyboard and TV or monitor to test it. During the first boot-up, it will ask you if you want to enable SSH, make sure you do.Automated Installation
Search the web on how to login to your Pi using PuTTY, this will give you a command prompt.Once your Pi is connected to the internet, type the following two commands:
wget http://pibus.info/pibus-install.sh
bash pibus-install.sh
Note! Some versions of libreELEC (8.0.x) have a GPIO bug that causes PiBUS poweroff to fail and stay powered. It is not yet clear exactly which versions. This can cause battery drain and makes Kodi bootup fail when you next start the car. If you have this problem, here is the current suggested work around, which installs a custom poweroff script that works better:
cd /storage
wget http://pibus.info/sw/pibus-poweroff.sh
chmod +x pibus-poweroff.sh
sync
Manual Installation (only for experts)
- This software runs on the Pi (along with an unmodified LibreELEC): pibus-20191219.zip
It basically reads and writes the ibus and generates keyboard presses.
It makes LibreELEC think you are using a real keyboard and your BMW think there's a CD-changer installed.
To install it, just extract the ZIP file and copy the pibus file onto your SD-card. This is one single file of approximately 28 KB, the other files inside the ZIP, you don't need.
To make the Pi run it on every boot, you need to add this into /storage/.config/autostart.sh:
/storage/pibus -c22 &
Or this if you have the version 4 board:
/storage/pibus -c22 -v4 &
The following flags can be passed to the pibus program:
-a <input>     Input select (0=CDC 1=AUX 2=TAPE) (V4 boards only)

-b             Car has bluetooth, don't use Phone and Speak buttons

-c <time>      Force CDC-info replies every <time> seconds (22 recommended)

-g <number>    GPIO number to use for IBUS line monitor (0 = Use TH3122) - experts only

-l <level>     Logging level (0=none 1=basic 2=default 3=verbose)

-m             Do not do CDC reset announcements

-n             Handle Next/Prev buttons directly (Z4 & X3 might require this)

-o             Make rotary dial direction opposite

-r             Do not switch to camera in reverse gear

-t <seconds>   Set the idle timeout in seconds (V4 boards only, default 300)

-v <number>    Specify PiBUS board version number. Only for V4 boards, V2/V3 boards don't need this flag

-z4            Use alternative Z4 keymap (Z4 and X3 owners should use this)
As a final step, login to your Raspberry Pi's command prompt make sure the execute flag is on for the two files by executing these commands:chmod +x /storage/pibuschmod +x /storage/.config/autostart.sh
If your CDC emulation is not working, or there's no ibus.txt log being created, see this screenshot and try to execute the same commands.
- If you have a Pi3, you need reconfigure the UART (serial ports). The automated install script (see above) can do this for you, but if you must do it manually:
mount -o remount,rw /flash
echo "dtoverlay=pi3-miniuart-bt" >> /flash/config.txt
wget -P /flash/overlays/ http://pibus.info/sw/pi3-miniuart-bt-overlay.dtb
mount -o remount,ro /flash
reboot
-
Modified Kodi skin for low-res screen (ELEC 6.0.x): skin.pm3-hd-pibus.tar.gz
Modified Kodi skin for low-res screen (ELEC 8.0.x): skin.pibus-latest.zip
Assuming you have placed this file in your /storage directory, you can unpack it from the Pi's command prompt like so:
cd /storage/.kodi/addonsOn the next reboot, it'll be available in the appearance menu.
tar xfzv /storage/skin.pm3-hd-pibus.tar.gz
- Once LibreELEC is running, do a screen calibration to match the corners of the picture to the BMW LCD screen. The calibration is a Kodi (XBMC) feature, which you can find in the settings menu.
| E46 / E39 / X5 | Z4 / X3 (requires -z4 parameter) | |||||||||||||||||||||||||||||||||||||||||||||||||||||||||||||||||||||||||||||||||||||||||||||

|

|
Audio Configuration of Kodi
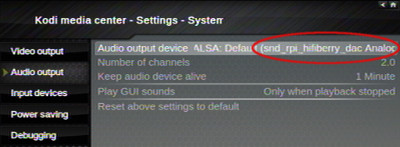
By default LibreELEC/Kodi will use the Raspberry Pi's 3.5mm audio jack, it needs to be re-configured to use the PiBUS 24-bit DAC.If you used the automated installation, this is already done.
If you used the manual method, you just need to add a line to a text file from the Pi's command prompt. Execute these commands:
mount -o remount,rw /flash
echo "dtoverlay=hifiberry-dac" >> /flash/config.txt
mount -o remount,ro /flash
reboot
After the Pi reboots go to Settings > System > Audio Output, and select snd_rpi_dac from the list of choices.
